I get a lot of questions from travelers who will be staying at the Peregrine lodge about what to bring and where to hike in the park. This post will not cover everything there is to know about the subject but it will give you a fair idea regarding the basics of what to have with you on a hike in Yosemite National Park.
This post is not about where to hike, for that I have a pretty good list of where to hike posted on our website under Information Links - Fast Facts page - Activities - Yosemite Hiking. I've started with hikes out of Yosemite Valley and will be adding other hikes in the park.
This post is about what to bring when hiking in the park. There are many wonderful, enchanting, and challenging hikes in the park, but before you go you should be prepared.
There are many pieces of wisdom that if one is fortunate may pick up along the path of life. For me one of the most important concepts I have ever learned and practiced can be summed up in a catchy little phrase, “Wishful thinking is not a plan.”
There are simply too many variables in the wilderness that can come into play that will absolutely crush wishful thinking. And if your life is depending on that kind of thinking, your survival will be dramatically reduced. So when you go into the wilderness, and make no mistake, a one hour hike from almost any trail- head in Yosemite will put you solidly into the wilderness, be prepared.
I tell our visitors that Yosemite may be a “park” but it sin’t a park like Disneyland or Hershey Park, or the English Gardens in Munich. It is a wilderness park, so get your mind adjusted to that reality. Unlike Disneyland, you will want or need a few items you would never need in the happiest place on earth.
So I will start with a basic list of what to bring and then go into some of my favorite hikes in the Valley and in the park.
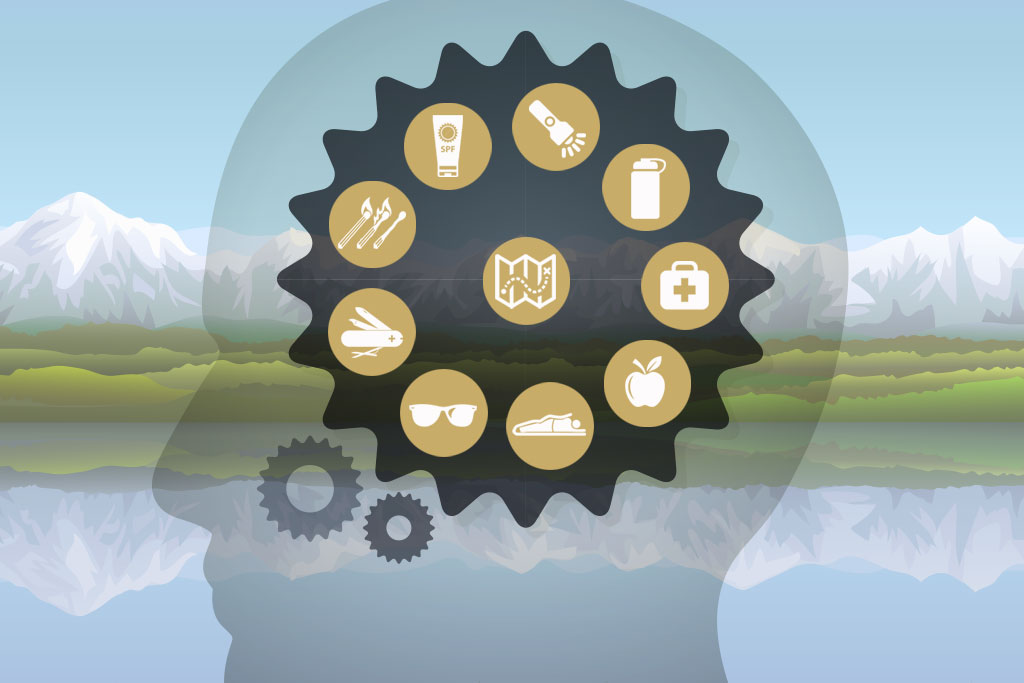
There are many things you can take along on a hike but simply put there are ten essential items that will help you to survive in the wilderness.
If you are a Sierra Club member no doubt you have an idea of what they are. If you served in the military, such as the Corps or the Army, or if you have attended the Sierra Club wilderness basics course you definitely have heard of them.
Simply put they are items you would take along on any outing into the wilderness. These items are called essentials because having each one of them with you could in the worse case scenario save your life, and at the very least make your adventure decidedly easier and safer.
I myself have over many years, starting with the boy scouts then on many back packing adventures as an adult, have collected these items into my day bag. I collected them based upon my experiences in the outdoors, whether in a relatively safe county park, or the back country miles from the nearest town or help if needed.
I have probably used every one of these items many times long before I heard the term “ten essentials.” So for me they make sense and have real world value.
When suggesting what to bring along for Yosemite hiking I think the ten essentials are a good place to start. Since this isn’t a wilderness basics course, I will list them and leave it up to you to educate yourself on the usage. Don’t worry, only a few of these items require special training though I have found even the use of the simplest things can be improved by experience.
So to be clear, for safety, survival and basic comfort you will want to have what are called the ten essentials.
Here is a big tip, don’t get lost. While many trails in Yosemite are well marked, there are many tricky places such as patches of granite and other areas where you may lose the trail of foot prints of those who went before you.
And don't rely on cairns as they are built by other hikers for various reasons, and do not always lead you back to the trail.
Or if you are on a trail that is not used a lot, there may be no other signs that others have been there before you. It is also not uncommon for trees to lie across the trail on some less popular or maintained areas of the park. This may lead to confusion as well.
Or the trail markers and signs may be very far apart, or you may just miss them.
I myself have been very thankful to find traces of horse manure on the trail after a night of intense down pour that washed out all remains of human boot prints on a very tricky mountian pass. The signs you are on a right trail can be varied, so never look a gift horse in the mouth.
Don’t think all the trails will be obvious. If there are no hikers passing you one direction or the other, you may have no one to ask if you come to a place and wonder where you are. If this is the case, prepare to be self reliant. If you are anywhere outside of the Yosemite Valley, you should at the minimum have a map.
You can get them on-line, at stores like REI, and at many places in the valley like the mountaineering store in Half Dome camp, or the visitor center.
Map (with protective case; learn how to read a map. You will want a topo map and if you do not know what that is you need to learn.)
Compass (know how to use it!) REI offers great basic map and compass reading seminars at their stores. The Sierra Club offers map and compass classes that bring you outdoors to use your skills hands on.
GPS or Digital Device with GPS/Compass (Don’t rely on a GPS. Any kind of digital or analog gear can fail leaving you, well... lost. So have a back up like a map & compass just in case)
Like the beach, you will burn very easily here in the Sierras. Along with sunscreen you will want a good hat or bandanna. The relative humidity here can be in the 20% range. Your nose, and lips will feel it, and chap stick is a good idea.
Sunscreen, Skin cancer is one of the most commonly diagnosed cancers in the U.S. According to the American Cancer Society, enough said!
SPF-rated lip balm, your lips and noes will thank you. Just don't share lip balm with a friend who uses it on thier nose. So bring your own.
Sunglasses ( Very important!) The sun here is intense and on a reflective surface like granite or lakes, you can be in trouble without them. Think snow blindness.
Hat ( Very important!) It is a good idea to protect your head. Edward Abbey said a man without a hat is a dead man. Ok, I'm paraphrasing, and he was talking about the desert, but I think the same urgency for protection is valid.
Here I am talking about clothes. There is a concept called layering. It is a system where you carry layers of clothes and put them on and take them off as the trail conditions warrant.
For example while hiking in the mountains on a typical day you may encounter afternoon thunder storms. It will go from sunny and 90 degrees to torrential down pour with 45- 50 degree temps. If you have a day pack and are prepared for layering, then you would simply pull out your fleece for warmth, and rain proof shell and enjoy one of the most awesome, spectacular and exhilarating events nature can throw at you.
You will hike a couple of miles with a smile on your face until the storm passes and the sun comes back out to hammer you with 90 degrees temps again.
If you did not have the extra clothes, those few miles may be the worst and most uncomfortably bad days you’ve ever had. You may even be at risk of hypothermia and death. I have experience snow in July, and 2 inches of hail in August.
There is a little saying I go by and it goes like this, there are no bad days, just bad gear. Ok, a bit simplistic but you get the idea.
What you bring in your day bag should be based on the time of year, that is, based upon the worst conditions you will possibly encounter.
For tips on what clothes/gear you may need, you are welcome to call me and ask for details more appropriate to when you will be in the park. But for now think Layering! Don’t leave home without it.
What is layering? simply put it is having a layer of garments with you that can when worn separately or all together will protect you from the elements such as sun, rain, cold, heat and humidity, etc.
In action it goes like this, you have a light shirt on for hiking, and a sweater in your pack if it gets cold. Then if it rains you may have a rain shell you can take out of your pack and put on over your light shirt and sweater.
Avoid cotton and adjust each layer based on the forecast; always prepare for the chance that conditions will and can change quickly on the trail.
Most outdoor based clothing is basically plastic, that is poly, polar, or fleece, or a blend of wool and a poly fiber. What these all have in common is that they can warm you even when wet.
I strongly recommend having a light weight rain shell to go over said plastic clothing.
You may ask why avoid cotton? The answer is cotton is heavy and will not insulate when wet. There is a saying among outdoor enthusiast, “cotton kills.” Most if not all the below list of suggestions are made from a poly blend. That’s right, better living through plastic, hey welcome to the 21 century.
Wicking T-shirt or long-sleeve top. Ok they may hold body odor better then cotton but you can wash them out and they dry quickly.
Wicking underwear or long-underwear bottoms. For those of you who don't like to get heat or chaffing rashes.
Quick-drying pants or shorts. My wife loves the convertible pants that go from long to shorts with a zipper pull.
Sun hat and/or rain hat. Not sure if there are any best hats, from the boonie hat favored by the Seal teams to baseball caps, to those back packing hats sold by outdoor research or North Face and all points in between, just have a hat! Of course it should pair well with your environment, season and the wine in your day bag.
Insulating hat or headband. I use BUFF head-ware. It warms at night and wicks away sweat and cools your head during the day due to evaporative cooling.
Insulating fleece or soft-shell jacket or vest and pants. At this point you may be thinking should I have a day bag or an overnight backpack? Actually you can get all of this gear in a size and weight that will fit easily into a day back. It's called packable clothing. Just remember you get what you pay for and packable adds to the price tag, windproof, breathable, and water proof even more. Shop at a quality outfitters, like REI. Just getting you ready to spend your money.
Bandanna or Buff. I use BUFF head-ware. It warms at night and wicks away sweat and cools your head during the day due to evaporative cooling. And they come in way cool colors and patterns.
I also carry a cotton bandanna, that right!, cotton!. I know, but it is great for cleaning things like water off your sunglasses when all your plastic clothes will only smear the water droplets across the lens.
Mosquito net. Ok so not an essential for survival but if you have ever hiked through a Sierra meadow with a few million little $#@((&—ers looking at you like a buffet you will think it is essential. Pardon my French glyphs.
Rain jacket. Even on the sunniest days you can get thunderstorms in the sierras. And depending on your altitude it can snow/hail any day of the year. Bring a packable rain jacket.
Rain pants. Yup same as above.
Having a flashlight or as our overseas cousins call a torch, is a good idea. Not only will it allow you to check out cool caves you might find but if you are still on the trail at sunset or after dark you will not be able to continue to hike safely without one.
It also makes for a great emergency beacon to get others’ attention when you are lost or if they are lost.
I was hiking down from the top of Nevada Falls one evening in early fall many years ago at dusk. A front was coming in and it was getting both cold and dark quickly. I was sure I was the last person down from Nevada Falls at least for the night and no others were behind me that I could see.
Though the day started out nice enough and sunny, it was now beginning to snow flurry. Suddenly I heard a voice yelling for help. It was coming from off the trail and down a steep embankment. I stopped to listen and when I determined the voice was not my imagination, I yelled back.
The response was, “help me, I’m lost!” By this time it was so dark off the trail I could not see anyone. The trail had taken a steep decent into the wood. I yelled down to ask if they had a flashlight on them so I could see where they were.
They did not, so I took off my day bag and fished out my flashlight and shined it down while waving it back and forth. I instructed the unfortunate person to follow my light.
A little while later I heard the sounds of someone climbing up to me with breaking twigs and the sound of crackling leaves. Moments later a figure came into view. It was a woman, completely wigged out at being lost most of the day.
This was from a so-called easy to follow trail from Happy Isles to the top of Nevada falls. Needless to say, she was happy to be found, and I was happy to have had been there for her.
I’ll never forget, she was waring jeans, a shirt, a light cotton sweater, and light weight tennis shoes. She had no day bag, no coat, no light, no water, no ten essentials. Clearly she was not prepared to spend a night lost.
At this point, it was dark enough to need the flashlight to return to the trailhead at Happy Isles.
I was fortunate to have had my flash light not only to see my way down as the sky was cloudy and no light came through from stars or moon. A flash light also let me avoid having to leave the trail, and possibly get lost myself in attempting a rescue. A flashlight. Don’t leave home without it!
Headlamp or flashlight I prefer to carry a headlamp which leaves my hands free for all kinds of things.
Extra batteries Not an essential but make sure you check to make sure any device needing batteries have new or very good batteries. There is a lot of outdoor gear using rechargeable batteries that are USB. USB recharge sticks are great, small and light weight. They will recharge a flash light and a cell phone.
I should not have to tell you how handy a first-aid kit is. You can get great little first-aid kits at any outfitters like REI, sporting goods stores, even Target.
Larger band aids and goss then normally comes with a standard kit.
Any medications I may have to be taking if necessary. If you are taking a medication that you cannot do without, bring extra. If you are forced to stay the night in the wilderness you will not have a life threatening issue from lack of medication. Or if lack of medication makes you think you might be able to fly, your friends will thank you for having it while you wait out the night on the side of that mountain.
Good to have medications. Maybe not essential but having that anti-diarrhea medication, ibuprofen, and anti-acid will make your life a lot better sometimes.
Surgical suture. I have both needle and thread as well as the band aid type which work pretty well.
If worse comes to worse and you have to stay a night or two out in the wilderness you will want fire for a number of reasons.
First for warmth, especially if you are out at anytime other then high summer. Even during the summer nights can get pretty cool at altitude.
Fire is also good for signaling. If someone is looking for you a fire is a good clue you are there.
Fire is what separates us from the animals, it gave the cave man the edge to make a world spanning civilization. It is comfort, an instrument, a guide, a catalyst for promoting biological diversity and healthy ecosystems, it is poetry, it is power.
Just remember with great power comes great responsibility. Make sure your fire is completely out. 90% of the most devastating fires in Yosemite have been human-caused, either through negligence or accident.
Learn how to have a safe fire in the wilderness. I may post an article on it in the future.
A lighter or matches in a waterproof container (with protective case; learn how to read a map. You will want a topo map and if you do not know what that is you need to learn.)
Fire starting material (I like the fire starting wax balls. They are lightweight and will start a fire very quickly)
Fire Starting Kits There are a lot of fire starting kits on the market. Some work better then others. Whatever method you choose you should know how to use it.
Back in the day a survival knife was about as close as anyone would get to having tools on a hike or backpack.
Now in the age of transformers we have the multi tool. I prefer a multi tool, great for just about anything you will need, like repairing shoes, day packs and gear.
I always take along a little duct tap, and those plastic self locking tie wraps as well. You would be surprised what you can McGyver with just those two things alone.
I have been able to repair back backs on a mountain pass at over 12,000 feet, as well as repair a broken Kayak rudder on a tiny sand island in the middle of a very windy, and big Lake Mead.
Knife or multi-tool. You can purchase a wide variety of good quality knives from an outfitter or a gun shop. In the case of a multi tool I would recommend a stainless steel model.
Repair supplies. A small roll of Duck Tape, plastic tie wraps, nylon chord, etc.
Collapsible snow shovel. For winter hiking, snow shoeing, and cross country ski it is a good idea.
You will use a lot of calories when hiking in the park. It is a good idea to have along food you will want on the trail and extra food in case you have to stay the night.
Your body spends an enormous amount of energy (food calories) keeping you cool in the heat, and warm in the cold. Eating is your most important defense against exhaustion.
Energy bars.They're tasty, convenient, and relatively healthy. Glucose Syrup is not healthy in large amounts and you should avoid a lot of it in your regular diet. It's another term for corn syrup. It's used in some energy bars because it bonds easily with dry or solid ingredients. Its short, simple sugar chains are rapidly absorbed, so it offers instant fuel that's ideal for pre hike energy. Avoid sugar alcohols, such as sorbitol, Xylitol, and maltitol, which are low-calorie sweeteners–that cause diarrhea.
Dried fruit and nuts. Nothing satisfies like a good apple, orange or pear. I recommend carrying fruit that can take rolling around in your backpack, you might find peaches, bananas, and plums less than desirable when you sit down to eat. Dried fruit weighs less and will not spoil.
Hard cheese and crackers.Hard cheeses are robust enough to survive on the trail and can take a moderate amount of heat. Sharp cheddar stood out as a favorite among the editors, getting high marks for our durability requirements. Seasoned or whole-wheat crackers add flavor to the somewhat bland experience. Nutritional pluses include plenty of protein, fat and carbohydrates..
I always recommend a water filter for any extended day trips in the summer or winter. You could, in an emergency, drink from any water source in the park. But unless it is a spring, thanks to the livestock introduced to Yosemite, you are taking a risk of contracting Giardia.
At the very least, I like to filter out any duck sh-t, bear sh-t, and any other free floating particles from that wonderful crystal clear mountain water you cannot see with your eyes.
Do not confuse energy drinks with good old fashioned water. Energy drinks contain lots of sugar and things that may actually cause dehydration like caffeine. When you hike, drink water.
Water bottles or hydration reservoir. Having water is a must. It is a good idea to have it ready, available and handy to access on the trial. If it is inside your pack you will probably not hydrate often enough because of the hassle of retrieving your bottle.
I seldom use a water bottle but when I do it is on my belt clip on on the outside of my pack for easy access.
Water filter or other treatment system. With a water filter you don’t need to carry as much water weight.
Let’s face it, with the best of intentions, that little 6-10 mile hike you planned on can for whatever reason turn into an overnight stay. If nothing else, you will want to probably put on all of your layers as well as eat your extra food for calorie replacement and warmth to get through the night.
At altitude which is much of Yosemite the hottest days will often become very cool nights.
Tent. If you are doing a serious hike and you think there is any possibility of not making it back in time, bring a small tent in your day bag. There are many quality light weight tents on the market today.
Bivy. Bivy sacks are small one person "tents", sort of..., if you are traveling alone a bivy a good light weight small package alternative to a tent.
Footwear: Good hiking boots or shoes. I see a lot of folks come to hike wearing far too much boot!
This is not the Himalayas and you do not need heavy leather hiking boots. Especially in the summer. The best boot is really a hiking "shoe" as long as it is supportive and is comfortable to wear.
There are many light-weight hiking shoes on the market. I lean towards Keens myself as I have a wide foot. I have even seen hikers in the back country wear sports sandals.
The main thing to remember with shoes is the lighter and more breathable, the better. They should have good arch support and a shank so the shoe will not twist too much going over rocks and obstacles on the trail.
I have seen folks in the back country with open and bleeding blisters limping along. Why? Well some have shoes that did not fit, too large or too small, borrowed from a friend, or the shoes were “city” shoes fit for a mall or office, but not for wilderness travel, but mostly because they had on big heavy leather boots with thick socks. Their feet blistered from the heat and friction of the boot and socks.
So light-weight hiking shoes and socks that wick the moisture away from your feet are the best bet.
Stay away from flat soled shoes like Vans or Keds. They will kill your feet on a day long hike. And keep in mind that even the best hiking shoe or boot will kill your feet if you wear them on an extended hike when they are brand new. Make sure your shoes are broken in and comfortable before you take them to the mountains.
Toiletries: While you may feel the need to take a dump in the woods, I would say that most of the time you will have taken care of this need before you hit the trail for a day hike.
So toilet paper will by in large be used by the ladies. Due to the popularity of the National Parks and especially Yosemite please consider the impact of thousands of visitors a year.
I have seen the most pristine and wonderful settings ruined by toilet paper left behind when someone has to go in the woods.
Please bring along a plastic zip lock baggy with you to stow your used toilet paper. Remember, pack it in and pack it out, for the benefit of the earth and others who follow behind you.
Toilet paper
Sanitation trowel
Satellite messenger: Personal locater beacon (Really great if you are in snow country or have a medical condition that would require emergency assistance.)
Day pack: How else to carry your ten essentials? A good day pack is important to have. It should be large enough to carry what you will need but not too large so you don’t carry around too much weight.


Yosemite Peregrine Lodging is located inside the gates of Yosemite National Park in the Yosemite West development. You have to enter Yosemite to get to Yosemite West. Don't let other hotel operators fool you. Ask for a physical address and check them out on a map before you make your reservation. Some accommodations claim to be minutes from Yosemite and are actually outside the park gates and an hour or more from valley.
Proprietor: Vonnie Coombs
Cell: 619-948-8561
7509 Henness Circle, Yosemite CA, 95389
E-mail: reservations@yosemiteperegrinelodge.com
 Yosemite Peregrine Lodging is located inside the gates of Yosemite National Park in the Yosemite West development. You have to enter Yosemite to get to Yosemite West. Don't let other hotel operators fool you. Ask for a physical address and check them out on a map before you make your reservation. Some accommodations claim to be minutes from Yosemite and are actually an hour or more.